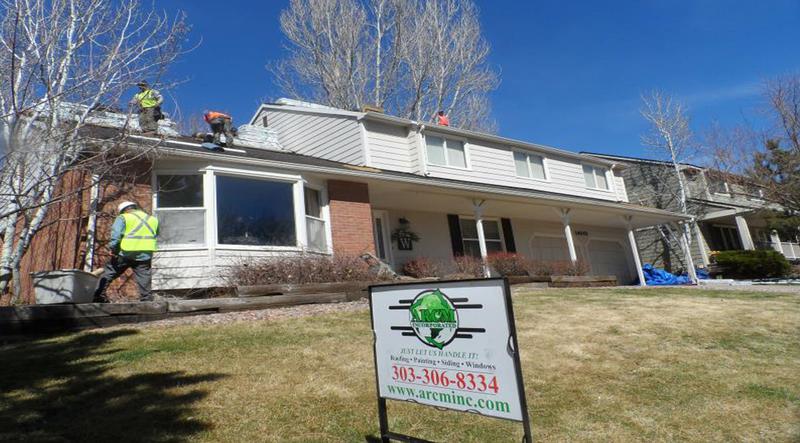
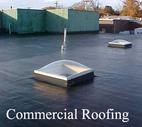
Heirloom Roofing Division
"Quality Materials & Workmanship"

2009 - 2016 ARCM Roofing Inc.© - All Rights Reserved
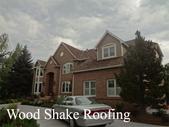
WOOD ROOF MAINTENANCE
Wood roofs should be maintained on a regular basis. Damaged or missing shakes or shingles should be replaced, and loose ones should be re-fastened. The roof and gutters should be cleaned, and tree branches should be trimmed back so that they don’t overhang the roof. Overhanging branches will cause leaves to accumulate on the roof and in gutters.
In areas subject to ice dam formation, nylon stockings filled with snow-melt chemicals can be used to melt through the dam to allow roof drainage. As fasteners loosen over time, cap shingles for ridges and hips will often begin to separate and allow moisture intrusion. They may lose wind resistance. Look for problems in valleys, at roof penetrations, and along the lower roof edges.
Squirrels and raccoons may chew or tear wood roofing, especially at areas that are decayed. Shingles with this kind of damage should be replaced.
The life expectancy of a roof varies, depending on a variety of factors
READ MORE ................
Roofing & Shingle Mfg
Malarkey
GAF
Owens Corning
CertainTeed Roofing
Woodshake Repairs
Woodshake Frequetly Asked Questions
Woodshake Roof Owners Beware
Common Questions about Wood Shake Roof:
Does My Roof Need Maintenance
Underlayment Is the Most Important Issue
Insurance Company Will Not Insure
Shake Nearing the end of its useful life
Here are five reasons NOT to re-roof with cedar shakes and shingles
(and that's if you're even allowed to - homes in certain forested areas aren't even permitted to re-roof with this highly flammable material):
Reason 1: Today's cedar roofs aren't what they used to be
Old-growth forests were, at one time, the source of many shake and shingle roofs, but that's no longer the case. And that means that the material used today doesn't offer the same hardness and high grain density, so they're very prone to shrinking and swelling as moisture content changes. The result is a product that offers a fraction of the lifepsan it did just a few generations ago.
Reason 2: Cedar and wood shakes and shingles are expensive
While it's typically true that you get what you pay for, that's not the case with wood and cedar shakes and shingles. You pay a premium for this roof material (it's costly to both buy and install) and what you get in exchange is a roof material with a lousy lifespan that will look ancient and haggard in just a few years. It's also incredibly eco-unfriendly AND seriously unsafe in the event of fire. Sounds like a sweet deal!
Reason 3: Cedar and wood shakes and shingles are a strain on the environment
Harvesting our limited resources for roofing material when there are far better alternatives is plain bad for the environment. Period.
Reason 4: Cedar and wood shakes and shingles require major upkeep
While it is possible for these roofs to last a fairly respectable amount of time, that only happens if they receive regular maintenance - and who does major, regular roof maintenance anymore? The days of hiring someone to re-graphite the roof and replace the loose, cracked and broken shingles are long gone. And that means that not only will your cedar/wood shake or shingle roof require replacement far too soon, given what you paid, it's going to look downright old and haggard in a matter of just a few years.
Reason 5: Cedar and wood shakes and shingles = kindling
Wood burns, so any roof made of wood that finds itself in the path of a fire is really just a big pile of kindlingThe purpose of the series “Mastering Roof Inspections” is to teach home inspectors, as well as insurance and roofing professionals, how to recognize proper and improper conditions while inspecting steep-slope, residential roofs. This series covers roof framing, roofing materials, the attic, and the conditions that affect the roofing materials and components, including wind and hail.
WOOD ROOF MAINTENANCE
Wood roofs should be maintained on a regular basis. Damaged or missing shakes or shingles should be replaced, and loose ones should be re-fastened. The roof and gutters should be cleaned, and tree branches should be trimmed back so that they don’t overhang the roof. Overhanging branches will cause leaves to accumulate on the roof and in gutters.
In areas subject to ice dam formation, nylon stockings filled with snow-melt chemicals can be used to melt through the dam to allow roof drainage. As fasteners loosen over time, cap shingles for ridges and hips will often begin to separate and allow moisture intrusion. They may lose wind resistance. Look for problems in valleys, at roof penetrations, and along the lower roof edges.
Squirrels and raccoons may chew or tear wood roofing, especially at areas that are decayed. Shingles with this kind of damage should be replaced.
The life expectancy of a roof varies, depending on a variety of factors, including the following:
climate zone and local environmental factors , such as salt air, heat, humidity, precipitation, and hail;
the quality of the shake or shingle;
the quality of the installation;
the quality of the maintenance;
the amount of foot traffic; and
any overhanging tree branches.
In addition, the CSSB recommends that pressure-treated shakes and shingles be used.
Pressure-treated shakes and shingles should also be used.
Wood Roof Repair Methods
Repairing damaged areas of wood roofs generally means replacing shakes or shingles.
Removing and replacing a shake or shingle is easy and takes less than five minutes.
Using a hammer, the shake is driven up far enough to pull the fasteners loose. The shake is then removed.
A new shake of the right size is inserted into place, and fasteners are installed beneath the butt of the overlying shake. If fasteners are angled up toward the peak, they’ll help pull the shingle up the roof as they’re driven, helping to hide the fasteners.
End of Useful Life
Once you understand the fundamentals of wood roofs, you’ll develop an increasingly better sense of where a roof stands in its lifespan at the time of your inspection. Wood roofs may last anywhere from 20 to 60 years. Talking to contractors in your area will help you develop a realistic idea of how long wood roofs can be expected to last locally.
An important factor regarding the speed at which a wood roof ages has to do with a combination of the factors listed above. Roofs located in harsher climate zones and those whose home site conditions degrade wood roofs will require more diligent maintenance. The quality of the material and installation are important, too.
More important than estimating the remaining lifespan is being able to recognize when a roof is near or at the end of its useful life.
Here are some of the clues that a roof is nearing the end of its useful life. They apply mainly to field shakes and shingles over a significant portion of the roof.
There are many loose, split or missing shakes or shingles.
Splits leave inadequate sidelaps.
The underlayment or roof deck is exposed.
There are many areas where shakes or shingles are thin or eroded through.
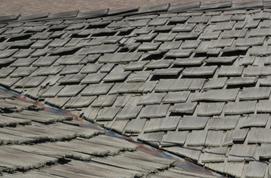
Widespread distortion (cupping or curling) is seen across a significant portion of the roof.
Cupping or curling is typically not a reason to describe a roof as at or near the end of its useful life. The exception is if it’s widespread and allowing moisture intrusion. The roof in the photo above indicates a cause for concern but the roof would not be recommended for repair unless there were signs of moisture intrusion.
The photo above shows a wood shingle roof that has been installed with interlayment that has reduced its ability to dry, resulting in excessive distortion, splitting and loss of shingles.
A large percentage of decay is typically found in butts.
Widespread damage is found, such as wind or hail damage.
**************************************************
The Repair and Replacement of Historic Wooden Shingle Roofs
Sharon C. Park, AIA
The Secretary of the Interior's "Standards for Rehabilitation" call for the repair or replacement of missing architectural features "based on accurate duplication of features, substantiated by historic, physical, or pictorial evidence rather than on conjectural designs." On a wooden shingle roof, it is important not only to match the size, shape, texture, and configuration of historic shingles, but also to match the craftsmanship and details that characterize the historic roof. Proper installation and maintenance will extend the life of the new roof.
Introduction
Wooden shingle roofs are important elements of many historic buildings. The special visual qualities imparted by both the historic shingles and the installation patterns should be preserved when a wooden shingle roof is replaced. This requires an understanding of the size, shape, and detailing of the historic shingle and the method of fabrication and installation. These combined to create roofs expressive of particular architectural styles, which were often influenced by regional craft practices. The use of wooden shingles from the early settlement days to the present illustrates an extraordinary range of styles (see illus. 1, 2, 3, 4).
Wooden shingle roofs need periodic replacement. They can last from 15 to over 60 years, but the shingles should be replaced before there is deterioration of other wooden components of the building. Appropriate replacement shingles are available, but careful research, design, specifications, and the selection of a skilled roofer are necessary to assure a job that will both preserve the appearance of the historic building and extend the useful life of the replacement roof.
Unfortunately, the wrong shingles are often selected or are installed in a manner incompatible with the appearance of the historic roof. There are a number of reasons why the wrong shingles are selected for replacement roofs. They include the failure to identify the appearance of the original shingles; unfamiliarity with available products; an inadequate budget, or a confusion in terminology. In any discussion about historic roofing materials and practices, it is important to understand the historic definitions of terms like "shingles," as well as the modern definitions or use of those terms by craftsmen and the industry. Historically, from the first buildings in America, these wooden roofing products were called shingles, regardless of whether they were the earliest handsplit or the later machine-sawn type. The term shake is a relatively recent one and today is used by the industry to distinguish the sawn products from the split products, but through most of our building history there has been no such distinction.
Considering the confusion among architects and others regarding these terms as they relate to the appearance of early roofs, it should be stated that there is a considerable body of documentary information about historic roofing practices and materials in this country, and that many actual specimens of historic shingles from various periods and places have been collected and preserved so that their historic appearances are well established. Essentially, the rustic looking shake that we see used so much today has little in common with the shingles that were used on most of our early buildings in America.
Throughout this Brief, the term shingle will be used to refer to historic wooden roofs in general, whether split or sawn, and the term shake will be used only when it refers to a commercially available product. The variety and complexity of terminology used for currently available products will be seen in the accompanying chart entitled "Shingles and Shakes."
This Brief discusses what to look for in historic wooden shingle roofs and when to replace them. It discusses ways to select or modify modern products to duplicate the appearance of a historic roof, offers guidance on proper installation, and provides information on coatings and maintenance procedures to help preserve the new roof.(1)
Wooden Shingle Roofs in America
Because trees were plentiful from the earliest settlement days, the use of wood for all aspects of construction is not surprising. Wooden shingles were lightweight, made with simple tools, and easily installed. Wooden shingle roofs were prevalent in the Colonies, while in Europe at the same time, thatch, slate and tile were the prevalent roofing materials. Distinctive roofing patterns exist in various regions of the country that were settled by the English, Dutch, Germans, and Scandinavians. These patterns and features include the size, shape and exposure length of shingles, special treatments such as swept valleys, combed ridges, and decorative butt end or long side-lapped beveled handsplit shingles. Such features impart a special character to each building, and prior to any restoration or rehabilitation project the physical and photographic evidence should be carefully researched in order to document the historic building as much as possible. Care should be taken not to assume that aged or deteriorated shingles in photographs represent the historic appearance.
Shingle Fabrication. Historically wooden shingles were usually thin (3/8"3/4"), relatively narrow (3"8"), of varying length (14"36"), and almost always smooth. The traditional method for making wooden shingles in the 17th and 18th centuries was to handsplit them from log sections known as bolts (see illus. 5A). These bolts were quartered or split into wedges. A mallet and froe (or ax) were used to split or rive out thin planks of wood along the grain. If a tapered shingle was desired, the bolt was flipped after each successive strike with the froe and mallet. The wood species varied according to available local woods, but only the heartwood, or inner section, of the log was usually used. The softer sapwood generally was not used because it deteriorated quickly. Because handsplit shingles were somewhat irregular along the split surface, it was necessary to dress or plane the shingles on a shavinghorse with a draw-knife or draw-shave (see illus. 5B) to make them fit evenly on the roof. This reworking was necessary to provide a tight-fitting roof over typically open shingle lath or sheathing boards. Dressing, or smoothing of shingles, was almost universal, no matter what wood was used or in what part of the country the building was located, except in those cases where a temporary or very utilitarian roof was needed.
Shingle fabrication was revolutionized in the early 19th century by steam-powered saw mills (see illus. 6). Shingle mills made possible the production of uniform shingles in mass quantities. The sawn shingle of uniform taper and smooth surface eliminated the need to hand dress. The supply of wooden shingles was therefore no longer limited by local factors. These changes coincided with (and in turn increased) the popularity of architectural styles such as Carpenter Gothic and Queen Anne that used shingles to great effect.
Handsplit shingles continued to be used in many places well after the introduction of machine sawn shingles. There were, of course, other popular roofing materials, and some regions rich in slate had fewer examples of wooden shingle roofs. Some western "boom" towns used sheet metal because it was light and easily shipped. Slate, terneplate, and clay tile were used on ornate buildings and in cities that limited the use of flammable wooden shingles. Wooden shingles, however, were never abandoned. Even in the 20th century, architectural styles such as the Colonial Revival and Tudor Revival, used wooden shingles.
Modern wooden shingles, both sawn and split, continue to be made, but it is important to understand how these new products differ from the historic ones and to know how they can be modified for use on historic buildings. Modern commercially available shakes are generally thicker than the historic handsplit counterpart and are usually left "undressed" with a rough, corrugated surface. The rough surface shake, furthermore, is often promoted as suitable for historic preservation projects because of its rustic appearance. It is an erroneous assumption that the more irregular the shingle, the more authentic or "historic" it will appear.
Historic Detailing and Installation Techniques. While the size, shape and finish of the shingle determine the roof's texture and scale, the installation patterns and details give the roof its unique character. Many details reflect the craft practices of the builders and the architectural style prevalent at the time of construction. Other details had specific purposes for reducing moisture penetration to the structure. In addition to the most visible aspects of a shingle roof, the details at the rake boards, eaves, ridges, hips, dormers, cupolas, gables, and chimneys should not be overlooked.
The way the shingles were laid was often based on functional and practical needs. Because a roof is the most vulnerable element of a building, many of the roofing details that have become distinctive features were first developed simply to keep water out. Roof combs on the windward side of a roof protect the ridge line. Wedges, or cant strips, at dormer cheeks roll the water away from the vertical wall. Swept valleys and fanned hips keep the grain of the wood in the shingle parallel to the angle of the building joint to aid water runoff. The slight projection of the shingles at the eaves directs the water runoff either into a gutter or off the roof away from the exterior wall. These details varied from region to region and from style to style. They can be duplicated even with the added protection of modern flashing.
In order to have a weathertight roof, it was important to have adequate coverage, proper spacing of shingles, and straight grain shingles. Many roofs were laid on open shingle lath or open sheathing boards (see illus. 7). Roofers typically laid three layers of shingles with approximately 1/3 of each shingle exposed to the weather. Spaces between shingles (1/8"1/2" depending on wood type) allowed the shingles to expand when wet. It was important to stagger each overlapping shingle by a minimum of 11/2" to avoid a direct path for moisture to penetrate a joint. Doubling or tripling the starter course at the eave gave added protection to this exposed surface. In order for the roof to lay as flat as possible, the thickness, taper and surface of the shingles was relatively uniform; any unevenness on handsplit shingles had already been smoothed away with a draw-knife. To keep shingles from curling or cupping, the shingle width was generally limited to less than 10".
Not all shingles were laid in evenly spaced, overlapping, horizontal rows. In various regions of the country, there were distinct installation patterns; for example, the biaxially-tapered long shingles occasionally found in areas settled by the Germans (see illus. 8). These long shingles were overlapped on the side as well as on top. This formed a ventilation channel under the shingles that aided drying. Because ventilation of the shingles can prolong their life, roofers paid attention to these details (see illus. 9).
Early roofers believed that applied coatings would protect the wood and prolong the life of the roof. In many cases they did; but in many cases, the shingles were left to weather naturally and they, too, had a long life. Eighteenth-century coatings included a pine pitch coating not unlike turpentine, and boiled linseed oil or fish oil mixed with oxides, red lead, brick dust, or other minerals to produce colors such as yellow, Venetian red, Spanish brown, and slate grey. In the 19th century, in addition to the earlier colors, shingles were stained or painted to complement the building colors: Indian red, chocolate brown, or brown-green. During the Greek Revival and later in the 20th century with other revival styles, green was also used. Untreated shingles age to a silver-grey or soft brown depending on the wood species.
The craft traditions of the builders often played an important role in the final appearance of the building. The Historic Details and Installation Patterns Chart (see illus. 10) identifies many of the features found on historic wooden roofs. These elements, different on each building, should be preserved in a re-roofing project.
Replacing Deteriorated Roofs: Matching the Historic Appearance
Historic wooden roofs using straight edge-grain heartwood shingles have been known to last over sixty years. Fifteen to thirty years, however, is a more realistic lifespan for most premium modern wooden shingle roofs. Contributing factors to deterioration include the thinness of the shingle, the durability of the wood species used, the exposure to the sun, the slope of the roof, the presence of lichens or moss growing on the shingle, poor ventilation levels under the shingle or in the roof, the presence of overhanging tree limbs, pollutants in the air, the original installation method, and the history of the roof maintenance. Erosion of the softer wood within the growth rings is caused by rainwater, wind, grit, fungus and the breakdown of cells by ultraviolet rays in sunlight. If the shingles cannot adequately dry between rains, if moss and lichens are allowed to grow, or if debris is not removed from the roof, moisture will be held in the wood and accelerate deterioration. Moisture trapped under the shingle, condensation, or poorly ventilated attics will also accelerate deterioration.
In addition to the eventual deterioration of wooden shingles, impact from falling branches and workmen walking on the roof can cause localized damage. If, however, over 20% of the shingles on any one surface appear eroded, cracked, cupped or split, or if there is evidence of pervasive moisture damage in the attic, replacement should be considered. If only a few shingles are missing or damaged, selective replacement may be possible. For limited replacement, the old shingle is removed and a new shingle can be inserted and held in place with a thin metal tab, or "babbie." This reduces disturbance to the sound shingles above. In instances where a few shingles have been cracked or the joint of overlapping shingles is aligned and thus forms a passage for water penetration, a metal flashing piece slipped under the shingle can stop moisture temporarily. If moisture is getting into the attic, repairs must be made quickly to prevent deterioration of the roof structural framing members.
When damage is extensive, replacement of the shingles will be necessary, but the historic sheathing or shingle lath under the shingles may be in satisfactory condition. Often, the historic sheathing or shingle laths, by their size, placement, location of early nail holes, and water stain marks, can give important information regarding the early shingles used. Before specifying a replacement roof, it is important to establish the original shingle material, configuration, detailing and installation (see illus. 11). If the historic shingles are still in place, it is best to remove several to determine the size, shape, exposure length, and special features from the unweathered portions. If there are already replacement shingles on the roof, it may be necessary to verify through photographic or other research whether the shingles currently on the roof were an accurate replacement of the historic shingles.
The following information is needed in order to develop accurate specifications for a replacement shingle:
Original wood type (White Oak, Cypress, Eastern White Pine, Western, Red Cedar, etc.)
Size of shingle (length, width, butt thickness, taper)
Exposure length and nailing pattern (amount of exposure, placement and type of nails)
Type of fabrication (sawn, handsplit, dressed, beveled, etc.)
Distinctive details (hips, ridges, valleys, dormers, etc.)
Decorative elements (trimmed butts, variety of pattern, applied color coatings, exposed nails)
Type of substrate (open shingle lath or sheathing, closed sheathing, insulated attics, sleepers, etc.)
Replacement roofs must comply with local codes which may require, for example, the use of shingles treated with chemicals or pressure-impregnated salts to retard fire. These requirements can usually be met without long-term visual effects on the appearance of the replacement roof.
The accurate duplication of a wooden shingle roof will help ensure the preservation of the building's architectural integrity. Unfortunately, the choice of an inappropriate shingle or poor installation can severely detract from the building's historic appearance (see illus. 12). There are a number of commercially available wooden roofing products as well as custom roofers who can supply specially-made shingles for historic preservation projects (see Shingle and Shake Chart, illus. 13). Unless restoration or reconstruction is being undertaken, shingles that match the visual appearance of the historic roof without replicating every aspect of the original shingles will normally suffice. For example, if the historic wood species is no longer readily available, Western Red Cedar or Eastern White Pine may be acceptable. Or, if the shingles are located high on a roof, sawn shingles or commercially available shakes with the rustic faces factory~sawn off may adequately reproduce the appearance of an historic handsplit and dressed shingle.
There will always be certain features, however, that are so critical to the building's character that they should be accurately reproduced. Following is guidance on matching the most important visual elements.
Highest Priority in Replacement Shingles:
* best quality wood with a similar surface texture
* matching size and shape: thickness, width, length
* matching installation pattern: exposure length, overlap, hips, ridges, valleys, etc.
* matching decorative features: fancy butts, color, exposed nails
Areas of Acceptable Differences:
* species of wood
* method of fabrication of shingle, if visual appearance matches
* use of fire retardants, or preservative treatments, if visual impact is minimal
* use of modern flashing, if sensitively installed
* use of small sleepers for ventilation, if the visual impact is minimal and rake boards are sensitively treated
* method of nailing, if the visual pattern matches
Treatments and Materials to Avoid:
* highly textured wood surfaces and irregular butt ends, unless documented
* standardized details (prefab hips, ridges, panels, etc.) unless documented
* too wide shingles or those with flat grain (which may curl), unless documented
What is Currently Available
Types of Wood: Western Red Cedar, Eastern White Pine, and White Oak are most readily available today. For custom orders, cypress, red oak, and a number of other historically used woods may still be available. Some experiments using nontraditional woods (such as yellow pine and hemlock) treated with preservative chemicals are being tested for the new construction market, but are generally too thick, curl too easily, or have too pronounced a grain for use on historic buildings.
Method of manufacture: Commercially available modern shingles and shakes are for the most part machine-made. While commercially available shakes are promoted by the industry as handsplit, most are split by machine (this reduces the high cost of hand labor). True handsplit shingles, made the traditional way with a froe and mallet, are substantially more expensive, but are more authentic in appearance than the rough, highly textured machine-split shakes. An experienced shingler can control the thickness of the handsplit shingle and keep the shingle surface grain relatively even. To have an even roof installation, it is important to have handsplit shingles of uniform taper and to have less than 1/8th variation across the surface of the shingle. For that reason, it is important to dress the shingles or to specify uniform butt thickness, taper, and surfaces. Commercially available shakes are shipped with a range of butt sizes within a bundle (e.g., ´", 5/8", 3/4" as a mix) unless otherwise specified. Commercially available shakes with the irregular surfaces sawn off are also available. In many cases, except for the residual circular saw marks, these products appear not unlike a dressed handsplit shingle.
Sawn shingles are still made much the same way as they were historically--using a circular saw. The circular saw marks are usually evident on the surface of most sawn shingles. There are a number of grooved, striated, or steamed shingles of the type used in the 20th century to effect a rustic or thatched appearance. Custom sawn shingles with fancy butts or of a specified thickness are still available through mill shops. In fact, shingles can be fabricated to the weathered thickness in order to be integrated into an existing historic roof. If sawn shingles are being used as a substitute for dressed handsplit shingles, it may be desirable to belt sand the surface of the sawn shingles to reduce the prominence of the circular saw marks.
As seen from the Shingle and Shake chart, few of the commercially available shakes can be used without some modification or careful specification. Some, such as heavy shakes with a corrugated face, should be avoided altogether. While length, width, and butt configuration can be specified, it is more difficult to ensure that the thickness and the texture will be correct. For that reason, whatever shingle or shake is desired, it is important to view samples, preferably an entire bundle, before specifying or ordering. If shingles are to be trimmed at the site for special conditions, such as fanned hips or swept valleys, additional shingles should be ordered.
Coatings and Treatments: Shingles are treated to obtain a fire-retardant rating; to add a fungicide preservative (generally toxic); to revitalize the wood with a penetrating stain (oil as well as water based); and to give color.
While shingles can be left untreated, local codes may require that only fire-retardant shingles be used. In those circumstances, there are several methods of obtaining rated shingles (generally class "B" or "C"). The most effective and longest lasting treatment is to have treated salts pressure-impregnated into the wood cells after the shingles have been cut. Another method (which must be periodically renewed) is to apply chemicals to the surface of the shingles. If treated shingles need trimming at the site, it is important to check with the manufacturer to ensure that the fire-retardant qualities will not be lost. Pressure-impregnated shingles, however, may usually be trimmed without loss of fire-retardant properties.
The life of a shingle roof can be drastically shortened if moss, lichens, fungi or bacterial spores grow on the wood. Fungicides (such as chromated copper arsenate, CCA) have been found to be effective in inhibiting such fungal growth, but most are toxic. Red cedar has a natural fungicide in the wood cells and unless the shingles are used in unusually warm, moist environments, or where certain strains of spores are found, an applied fungicide is usually not needed. For most woods, the Forest Products Laboratory of the U.S. Department of Agriculture has found that fungicides do extend the life of the shingles by inhibiting growth on or in the wood. There are a variety available. Care should be taken in applying these chemicals and meeting local code requirements for proper handling.
Penetrating stains and water repellent sealers are sometimes recommended to revitalize wood shingles subject to damage by ultraviolet rays. Some treatments are oil-borne, some are waterborne, and some are combined with a fungicide or a water repellent. If any of these treatments is to be used, they should be identified as part of the specifications. Manufacturers should be consulted regarding the toxicity or other potential complications arising from the use of a product or of several in combination. It is also important not to coat the shingles with vapor impermeable solutions that will trap moisture within the shingle and cause rotting from beneath.
Specifications for the Replacement Roof
Specifications and roofing details should be developed for each project. Standard specifications may be used as a basic format, but they should be modified to reflect the conditions of each job. Custom shingles can still be ordered that accurately replicate a historic roof, and if the roof is simple, an experienced shingler could install it without complicated instructions. Most rehabilitation projects will involve competitive bidding, and each contractor should be given very specific information as to what type of shingles are required and what the installation details should be. For that reason, both written specifications and detailed drawings should be part of the construction documents.
For particularly complex jobs, it may be appropriate to indicate that only roofing contractors with experience in historic preservation projects be considered (see illus. 14). By prequalifying the bidders, there is greater assurance that a proper job will be done. For smaller jobs, it is always recommended that the owner or architect find a roofing contractor who has recently completed a similar project and that the roofers are similarly experienced.
Specifications identify exactly what is to be received from the supplier, including the wooden shingles, nails, flashing, and applied coatings. The specifications also include instructions on removing the old roofing (sometimes two or more earlier roofs), and on preparing the surface for the new shingles, such as repairing damage to the lath or sheathing boards. If there are to be modifications to a standard product, such as cutting beveled butts, planing off residual surface circular saw marks, or controlling the mixture of acceptable widths (3"8"), these too should be specified. Every instruction for modifying the shingles themselves should be written into the specifications or they may be overlooked.
The specifications and drawn details should describe special features important to the roof. Swept valleys, combed ridges, or wedged dormer cheek runoffs should each be detailed not only with the patterning of the shingles, but also with the placement of flashing or other unseen reinforcements. There are some modern products that appear to be useful. For example, paper coated and reinforced metal laminated flashing is easy to use and, in combination with other flashing, gives added protection over eaves and other vulnerable areas; adhesives give a stronger attachment at projecting roofing combs that could blow away in heavy wind storms. Clear or light colored sealants may be less obvious than dark mastic often used in conjunction with flashing or repairs. These modern treatments should not be overlooked if they can prolong the life of the roof without changing its appearance.
Roofing Practices to Avoid
Certain common roofing practices for modern installations should be avoided in re-roofing a historic building unless specifically approved in advance by the architect. These practices interfere with the proper drying of the shingles or result in a sloppy installation that will accelerate deterioration (see illus. 15). They include improper coverage and spacing of shingles, use of staples to hold shingles, inadequate ventilation, particularly for heavily insulated attics, use of heavy building felts as an underlayment, improper application of surface coatings causing stress in the wood surfaces, and use of inferior flashing that will fail while the shingles are still in good condition.
Avoid skimpy shingle coverage and heavy building papers. It has become a common modern practice to lay impregnated roofing felts under new wooden shingle roofs. The practice is especially prevalent in roofs that do not achieve a full triple layering of shingles. Historically, approximately one third of each single was exposed, thus making a three-ply or three-layered roof. This assured adequate coverage. Due to the expense of wooden shingles today, some roofers expose more of the shingle if the pitch of the roof allows, and compensate for less than three layers of shingles by using building felts interwoven at the top of each row of shingles. This absorptive material can hold moisture on the underside of the shingles and accelerate deterioration. If a shingle roof has proper coverage and proper flashing, such felts are unnecessary as a general rule. However, the selective use of such felts or other reinforcements at ridges, hips and valleys does appear to be beneficial.
Beware of heavily insulated attic rafters. Historically, the longest lasting shingle roofs were generally the ones with the best roof ventilation. Roofs with shingling set directly on solid sheathing and where there is insulation packed tightly between the wooden rafters without adequate ventilation run the risk of condensation-related moisture damage to wooden roofing components. This is particularly true for air-conditioned structures. For that reason, if insulation must be used, it is best to provide ventilation channels between the rafters and the roof decking, to avoid heavy felt building papers, to consider the use of vapor barriers, and perhaps to raise the shingles slightly by using "sleepers" over the roof deck. This practice was popular in the 1920s in what the industry called a "Hollywood" installation, and examples of roofs lasting 60 years are partly due to this undershingle ventilation (refer to illus. 9).
Avoid staples and inferior flashing. The common practice of using pneumatic staple guns to affix shingles can result in shooting staples through the shingles, in crushing the wood fibers, or in cracking the shingle. Instead, corrosion resistant nails, generally with barked or deformed shanks long enough to extend about 3/4" into the roof decking, should be specified. Many good roofers have found that the pneumatic nail guns, fitted with the proper nails and set at the correct pressure with the nails just at the shingle surface, have worked well and reduced the stress on shingles from missed hammer blows. If red cedar is used, copper nails should not be specified because a chemical reaction between the wood and the copper will reduce the life of the roof. Hot-dipped, zinc-coated, aluminum, or stainless steel nails should be used. In addition, copper flashing and gutters generally should not be used with red cedar shingles as staining will occur, although there are some historic examples where very heavy gauge copper was used which outlasted the roof shingles. Heavier weight flashing (2() oz.) holds up better than lighter flashing, which may deteriorate faster than the shingles. Some metals may react with salts or chemicals used to treat the shingles. This should be kept in mind when writing specifications. Terne-coated stainless steel and lead-coated copper are generally the top of the line if copper is not appropriate.
Avoid patching deteriorated roof lath or sheathing with plywood or composite materials. Full size lumber may have to be custom ordered to match the size and configuration of the original sheathing in order to provide an even surface for the new shingles. It is best to avoid plywood or other modern composition boards that may deteriorate or delaminate in the future if there is undetected moisture or leakage. If large quantities of shingle lath or sheathing must be removed and replaced, the work should be done in sections to avoid possible shifting or collapse of the roof structure.
Avoid spray painting raw shingles on a roof after installation. Rapidly drying solvent in the paint will tend to warp the exposed surface of the shingles. Instead, it is best to dip new shingles prior to installation to keep all of the wood fibers in the same tension. Once the entire shingle has been treated, however, later coats can be limited to the exposed surface.
Maintenance
The purpose of regular or routine maintenance is to extend the life of the roof. The roof must be kept clean and inspected for damage both to the shingles and to the flashing, sheathing, and gutters. If the roof is to be walked on, rubber soled shoes should be worn. If there is a simple ridge, a ladder can be hooked over the roof ridge to support and distribute the weight of the inspector.
Keeping the roof free of debris is important. This may involve only sweeping off pine needles, leaves and branches as needed. It may involve trimming overhanging branches. Other aspects of maintenance, such as removal of moss and lichen buildup, are more difficult. While they may impart a certain charm to roofs, these moisture-trapping organisms will rot the shingles and shorten the life of the roof. Buildups may need scraping and the residue removed with diluted bleaching solutions (chlorine), although caution should be used for surrounding materials and plants. Some roofers recommend power washing the roofs periodically to remove the dead wood cells and accumulated debris. While this makes the roof look relatively new, it can put a lot of water under shingles, and the high pressure may crack or otherwise damage them. The added water may also leach out applied coatings.
If the roof has been treated with a fungicide, stain, or revitalizing oil, it will need to be re-coated every few years (usually every 45). The manufacturer should be consulted as to the effective life of the coating. With the expense associated with installation of wood shingles, it is best to extend the life of the roof as long as possible. One practical method is to order enough shingles in the beginning to use for periodic repairs.
Periodic maintenance inspections of the roof may reveal loose or damaged shingles that can be selectively replaced before serious moisture damage occurs (see illus. 16). Keeping the wooden shingles in good condition and repairing the roof, flashing and guttering, as needed, can add years of life to the roof.
Conclusion
A combination of careful research to determine the historic appearance of the roof, good specifications, and installation details designed to match the historic roof, and long-term maintenance, will make it possible to have not only a historically authentic roof, but a cost-effective one. It is important that professionals be part of the team from the beginning. A preservation architect should specify materials and construction techniques that will best preserve the roof's historic appearance. The shingle supplier must ensure that the best product is delivered and must stand behind the guarantee if the shipment is not correct. The roofer must be knowledgeable about traditional craft practices. Once the new shingle roof is in place, it must be properly maintained to give years of service.
NOTE (1) Preservation Brief 4: Roofing for Historic Buildings discusses research methods, analysis of deterioration, and the general significance of historic roofs